【Mac】Python の MeCab で YouTube コメントを 形態素解析にかける

せっかく YouTube Data API でコメントを抽出できるので、今回は YouTube のコメント抽出の方法の紹介とともに、コメント欄にどんな単語が出てくるのか Python の MeCab で形態素解析をしたいと思います。

とりあえず Mac ローカル環境で触りだけやってみます。

  1. YouTube Data API でコメント情報を抽出
  2. YouTube 動画のコメントを MeCab で処理する

ちなみに API キーの取得やライブラリのインストールがまだの場合は下記記事をどうぞ。

1. YouTube Data API でコメント情報を抽出

まずはコメント情報を抽出するところから。コメント関連では CommentsThreads と Comments の二つがあり、両方とも JSON 形式で取得する事ができます。

CommentThreads

まず、CommentThreads では動画 ID やチャンネル ID をもとに、それらの ID に紐づくコメントを抽出することができます。

例えば動画 ID 「fdsaZ8EMR2U」のコメント 5 件のデータを取る場合はこんな感じ。

# -*- coding: utf-8 -*-

# Sample Python code for youtube.commentThreads.list
# See instructions for running these code samples locally:
# https://developers.google.com/explorer-help/guides/code_samples#python

import os

import googleapiclient.discovery

def main():
    # Disable OAuthlib's HTTPS verification when running locally.
    # *DO NOT* leave this option enabled in production.
    os.environ["OAUTHLIB_INSECURE_TRANSPORT"] = "1"

    api_service_name = "youtube"
    api_version = "v3"
    DEVELOPER_KEY = "YOUR_API_KEY"

    youtube = googleapiclient.discovery.build(
        api_service_name, api_version, developerKey = DEVELOPER_KEY)

    request = youtube.commentThreads().list(
        part="id,replies,snippet",
        maxResults=5,
        videoId="fdsaZ8EMR2U"
    )
    response = request.execute()

    print(response)

if __name__ == "__main__":
    main()

下記の様な JSON が返ってきます。コメントの内容、投稿主のチャンネル名などが含まれています。そして「replies」にはコメントに対する返信も含まれます。

{
  "kind": "youtube#commentThreadListResponse",
  "etag": "tSw5WSiFS4IMMytcgoYXJ9zpu6I",
  "nextPageToken": "QURTSl9pMDFKVnZtTFl0NFZOdnhaZFpXaFBOcWU5aDA0QWM5bDVpYk5oVTd1WDQwSDY1cU11OVBOZHNnWFNOTmNJby1Db1JpWno2Qnd5bw==",
  "pageInfo": {
    "totalResults": 5,
    "resultsPerPage": 5
  },
  "items": [
    {
      "kind": "youtube#commentThread",
      "etag": "An3zz04lgE7jUVO7VXXmqfdwFjk",
      "id": "UgwDY44NUll4uiZXqqx4AaABAg",
      "snippet": {
        "videoId": "fdsaZ8EMR2U",
        "topLevelComment": {
          "kind": "youtube#comment",
          "etag": "Kty1w2F4dTbXmakl-ywdK28vLEg",
          "id": "UgwDY44NUll4uiZXqqx4AaABAg",
          "snippet": {
            "videoId": "fdsaZ8EMR2U",
            "textDisplay": "SO gooood",
            "textOriginal": "SO gooood",
            "authorDisplayName": "fatt musiek",
            "authorProfileImageUrl": "https://yt3.ggpht.com/ytc/AAUvwngpQ-20jVq0c-9aC-wDJ87aTKi2QvPLTRN2GXGRaw=s48-c-k-c0x00ffffff-no-rj",
            "authorChannelUrl": "http://www.youtube.com/channel/UCl3ha3zwY9p6CemIZZXIdXQ",
            "authorChannelId": {
              "value": "UCl3ha3zwY9p6CemIZZXIdXQ"
            },
            "canRate": true,
            "viewerRating": "none",
            "likeCount": 0,
            "publishedAt": "2021-05-22T18:48:34Z",
            "updatedAt": "2021-05-22T18:48:34Z"
          }
        },
        "canReply": true,
        "totalReplyCount": 0,
        "isPublic": true
      }
    },
    {
      "kind": "youtube#commentThread",
      "etag": "QVJH5RHTNij1fN5jRj_mNcDscHA",
      "id": "Ugx8sUuwqKqPVG9eSuJ4AaABAg",
      "snippet": {
        "videoId": "fdsaZ8EMR2U",
        "topLevelComment": {
          "kind": "youtube#comment",
          "etag": "Y_SsBrGGxQoLpcztQqND9wGarUc",
          "id": "Ugx8sUuwqKqPVG9eSuJ4AaABAg",
          "snippet": {
            "videoId": "fdsaZ8EMR2U",
            "textDisplay": "so what if really yuffie have met johnny hehe",
            "textOriginal": "so what if really yuffie have met johnny hehe",
            "authorDisplayName": "GregOrio Barachina",
            "authorProfileImageUrl": "https://yt3.ggpht.com/ytc/AAUvwnjgJE6zBYksYQWt8TmKlMDYOyG0t-BHPNWWmvUUPQ=s48-c-k-c0x00ffffff-no-rj",
            "authorChannelUrl": "http://www.youtube.com/channel/UCUs2OJ4-KqYGS2EPJCDj7tQ",
            "authorChannelId": {
              "value": "UCUs2OJ4-KqYGS2EPJCDj7tQ"
            },
            "canRate": true,
            "viewerRating": "none",
            "likeCount": 0,
            "publishedAt": "2021-05-21T13:42:45Z",
            "updatedAt": "2021-05-21T13:42:45Z"
          }
        },
        "canReply": true,
        "totalReplyCount": 0,
        "isPublic": true
      }
    },
    {
      "kind": "youtube#commentThread",
      "etag": "ggLtp9jtNyrqb3JSvzkvUDon7gg",
      "id": "UgwP-4ucsrWh_iXJQMN4AaABAg",
      "snippet": {
        "videoId": "fdsaZ8EMR2U",
        "topLevelComment": {
          "kind": "youtube#comment",
          "etag": "Raxyf3_Zw3ksZyGeWDt7_HHW8SA",
          "id": "UgwP-4ucsrWh_iXJQMN4AaABAg",
          "snippet": {
            "videoId": "fdsaZ8EMR2U",
            "textDisplay": "The Aerith and Cloud scene is much more meaningful than the one with Tifa. Still a good scene but come on...Aerith just appearing amongst the flowers and getting to see her again...priceless",
            "textOriginal": "The Aerith and Cloud scene is much more meaningful than the one with Tifa. Still a good scene but come on...Aerith just appearing amongst the flowers and getting to see her again...priceless",
            "authorDisplayName": "Maxx Doran",
            "authorProfileImageUrl": "https://yt3.ggpht.com/ytc/AAUvwnixfMDBxLt_TfUEjlpHhU-OvwE1vjCgpFBAVIMxjg=s48-c-k-c0x00ffffff-no-rj",
            "authorChannelUrl": "http://www.youtube.com/channel/UCXcLTX_9fNHLVAMr_plxeqQ",
            "authorChannelId": {
              "value": "UCXcLTX_9fNHLVAMr_plxeqQ"
            },
            "canRate": true,
            "viewerRating": "none",
            "likeCount": 0,
            "publishedAt": "2021-05-18T01:50:04Z",
            "updatedAt": "2021-05-18T01:50:04Z"
          }
        },
        "canReply": true,
        "totalReplyCount": 0,
        "isPublic": true
      }
    },
    {
      "kind": "youtube#commentThread",
      "etag": "ptUVfOGBkZDnUXKFoDaGnQ9Y-gw",
      "id": "UgzTN_4ek7syWNNbCrB4AaABAg",
      "snippet": {
        "videoId": "fdsaZ8EMR2U",
        "topLevelComment": {
          "kind": "youtube#comment",
          "etag": "L3vDroBKOAklgIqKSkcX_JvLn_g",
          "id": "UgzTN_4ek7syWNNbCrB4AaABAg",
          "snippet": {
            "videoId": "fdsaZ8EMR2U",
            "textDisplay": "You caught on to the magnify barrier idea so early. I was part way into hard mode before I thought of that.",
            "textOriginal": "You caught on to the magnify barrier idea so early. I was part way into hard mode before I thought of that.",
            "authorDisplayName": "Justin Edwards",
            "authorProfileImageUrl": "https://yt3.ggpht.com/ytc/AAUvwngz1mU5zD3QHSRVU3jXTEZApnkYsmAzCKFXxUyD1w=s48-c-k-c0x00ffffff-no-rj",
            "authorChannelUrl": "http://www.youtube.com/channel/UCO-oPQJCpNw87M6YbcuuFMw",
            "authorChannelId": {
              "value": "UCO-oPQJCpNw87M6YbcuuFMw"
            },
            "canRate": true,
            "viewerRating": "none",
            "likeCount": 0,
            "publishedAt": "2021-05-10T07:25:36Z",
            "updatedAt": "2021-05-10T07:25:36Z"
          }
        },
        "canReply": true,
        "totalReplyCount": 0,
        "isPublic": true
      }
    },
    {
      "kind": "youtube#commentThread",
      "etag": "vfaqu09YbjpC_akz6riq0_XpSCw",
      "id": "UgygOOysmSAraKnx81h4AaABAg",
      "snippet": {
        "videoId": "fdsaZ8EMR2U",
        "topLevelComment": {
          "kind": "youtube#comment",
          "etag": "k8vIS0anrGkqCcFfyj0gnrUwXQI",
          "id": "UgygOOysmSAraKnx81h4AaABAg",
          "snippet": {
            "videoId": "fdsaZ8EMR2U",
            "textDisplay": "Y'know Max, you COULD have just run 5k steps in Aerith's garden, checked what the Materia did, and moved on. Or, maybe, look up an online guide, since by now I'm sure SOMEONE has posted one.",
            "textOriginal": "Y'know Max, you COULD have just run 5k steps in Aerith's garden, checked what the Materia did, and moved on. Or, maybe, look up an online guide, since by now I'm sure SOMEONE has posted one.",
            "authorDisplayName": "Soma Cruz the Demigod of Balance",
            "authorProfileImageUrl": "https://yt3.ggpht.com/ytc/AAUvwnilg2dkOBvJqeTbW34CBoxURHLWv78fnbCRkArv=s48-c-k-c0x00ffffff-no-rj",
            "authorChannelUrl": "http://www.youtube.com/channel/UCNaiemmWvNbzfaQm5e3hyqA",
            "authorChannelId": {
              "value": "UCNaiemmWvNbzfaQm5e3hyqA"
            },
            "canRate": true,
            "viewerRating": "none",
            "likeCount": 0,
            "publishedAt": "2021-05-07T02:21:29Z",
            "updatedAt": "2021-05-07T02:21:29Z"
          }
        },
        "canReply": true,
        "totalReplyCount": 1,
        "isPublic": true
      },
      "replies": {
        "comments": [
          {
            "kind": "youtube#comment",
            "etag": "oMSJ1drDJreTmguX72NWydzfbcY",
            "id": "UgygOOysmSAraKnx81h4AaABAg.9N10GKEX1209N2h_vQGc9Y",
            "snippet": {
              "videoId": "fdsaZ8EMR2U",
              "textDisplay": "\u003ca href=\"https://www.youtube.com/watch?v=fdsaZ8EMR2U&t=38m03s\"\u003e38:03\u003c/a\u003e These things don't stagger? But each time they clone, they lose health, and the clones are much weaker. Damn, I see why you had trouble with these, Max.",
              "textOriginal": "38:03 These things don't stagger? But each time they clone, they lose health, and the clones are much weaker. Damn, I see why you had trouble with these, Max.",
              "parentId": "UgygOOysmSAraKnx81h4AaABAg",
              "authorDisplayName": "Soma Cruz the Demigod of Balance",
              "authorProfileImageUrl": "https://yt3.ggpht.com/ytc/AAUvwnilg2dkOBvJqeTbW34CBoxURHLWv78fnbCRkArv=s48-c-k-c0x00ffffff-no-rj",
              "authorChannelUrl": "http://www.youtube.com/channel/UCNaiemmWvNbzfaQm5e3hyqA",
              "authorChannelId": {
                "value": "UCNaiemmWvNbzfaQm5e3hyqA"
              },
              "canRate": true,
              "viewerRating": "none",
              "likeCount": 0,
              "publishedAt": "2021-05-07T18:08:01Z",
              "updatedAt": "2021-05-07T18:08:01Z"
            }
          }
        ]
      }
    }
  ]
}

Comments

Comments ではコメント ID を直接指定してデータを取得します。上の例で取得した 5 つのコメント ID を「id」に指定してデータを取得してみます。

# -*- coding: utf-8 -*-

# Sample Python code for youtube.comments.list
# See instructions for running these code samples locally:
# https://developers.google.com/explorer-help/guides/code_samples#python

import os

import googleapiclient.discovery

def main():
    # Disable OAuthlib's HTTPS verification when running locally.
    # *DO NOT* leave this option enabled in production.
    os.environ["OAUTHLIB_INSECURE_TRANSPORT"] = "1"

    api_service_name = "youtube"
    api_version = "v3"
    DEVELOPER_KEY = "YOUR_API_KEY"

    youtube = googleapiclient.discovery.build(
        api_service_name, api_version, developerKey = DEVELOPER_KEY)

    request = youtube.comments().list(
        part="id,snippet",
        id="UgwDY44NUll4uiZXqqx4AaABAg,Ugx8sUuwqKqPVG9eSuJ4AaABAg,UgwP-4ucsrWh_iXJQMN4AaABAg,UgzTN_4ek7syWNNbCrB4AaABAg,UgygOOysmSAraKnx81h4AaABAg"
    )
    response = request.execute()

    print(response)

if __name__ == "__main__":
    main()

下記の様な JSON が返ってきます。CommentThreads の方ではコメントが投稿された動画の ID や、コメントに対する返信も含まれていましたが、Comments の方には含まれません。

{
  "kind": "youtube#commentListResponse",
  "etag": "vwaB3KAa_Snb_GuTkkMYrlL7Jrg",
  "items": [
    {
      "kind": "youtube#comment",
      "etag": "E9ovRZPTGOUQzHb0AEiKA26EJxY",
      "id": "UgwDY44NUll4uiZXqqx4AaABAg",
      "snippet": {
        "textDisplay": "SO gooood",
        "textOriginal": "SO gooood",
        "authorDisplayName": "fatt musiek",
        "authorProfileImageUrl": "https://yt3.ggpht.com/ytc/AAUvwngpQ-20jVq0c-9aC-wDJ87aTKi2QvPLTRN2GXGRaw=s48-c-k-c0x00ffffff-no-rj",
        "authorChannelUrl": "http://www.youtube.com/channel/UCl3ha3zwY9p6CemIZZXIdXQ",
        "authorChannelId": {
          "value": "UCl3ha3zwY9p6CemIZZXIdXQ"
        },
        "canRate": true,
        "viewerRating": "none",
        "likeCount": 0,
        "publishedAt": "2021-05-22T18:48:34Z",
        "updatedAt": "2021-05-22T18:48:34Z"
      }
    },
    {
      "kind": "youtube#comment",
      "etag": "FG5oWvmMF39kDNl_rlnzb0bsSWM",
      "id": "Ugx8sUuwqKqPVG9eSuJ4AaABAg",
      "snippet": {
        "textDisplay": "so what if really yuffie have met johnny hehe",
        "textOriginal": "so what if really yuffie have met johnny hehe",
        "authorDisplayName": "GregOrio Barachina",
        "authorProfileImageUrl": "https://yt3.ggpht.com/ytc/AAUvwnjgJE6zBYksYQWt8TmKlMDYOyG0t-BHPNWWmvUUPQ=s48-c-k-c0x00ffffff-no-rj",
        "authorChannelUrl": "http://www.youtube.com/channel/UCUs2OJ4-KqYGS2EPJCDj7tQ",
        "authorChannelId": {
          "value": "UCUs2OJ4-KqYGS2EPJCDj7tQ"
        },
        "canRate": true,
        "viewerRating": "none",
        "likeCount": 0,
        "publishedAt": "2021-05-21T13:42:45Z",
        "updatedAt": "2021-05-21T13:42:45Z"
      }
    },
    {
      "kind": "youtube#comment",
      "etag": "WQw2UyILXAhkYOAl-AKScZi1pCY",
      "id": "UgwP-4ucsrWh_iXJQMN4AaABAg",
      "snippet": {
        "textDisplay": "The Aerith and Cloud scene is much more meaningful than the one with Tifa. Still a good scene but come on...Aerith just appearing amongst the flowers and getting to see her again...priceless",
        "textOriginal": "The Aerith and Cloud scene is much more meaningful than the one with Tifa. Still a good scene but come on...Aerith just appearing amongst the flowers and getting to see her again...priceless",
        "authorDisplayName": "Maxx Doran",
        "authorProfileImageUrl": "https://yt3.ggpht.com/ytc/AAUvwnixfMDBxLt_TfUEjlpHhU-OvwE1vjCgpFBAVIMxjg=s48-c-k-c0x00ffffff-no-rj",
        "authorChannelUrl": "http://www.youtube.com/channel/UCXcLTX_9fNHLVAMr_plxeqQ",
        "authorChannelId": {
          "value": "UCXcLTX_9fNHLVAMr_plxeqQ"
        },
        "canRate": true,
        "viewerRating": "none",
        "likeCount": 0,
        "publishedAt": "2021-05-18T01:50:04Z",
        "updatedAt": "2021-05-18T01:50:04Z"
      }
    },
    {
      "kind": "youtube#comment",
      "etag": "Vchl7kutnRgZb-uKYjMNMrJQ2qQ",
      "id": "UgzTN_4ek7syWNNbCrB4AaABAg",
      "snippet": {
        "textDisplay": "You caught on to the magnify barrier idea so early. I was part way into hard mode before I thought of that.",
        "textOriginal": "You caught on to the magnify barrier idea so early. I was part way into hard mode before I thought of that.",
        "authorDisplayName": "Justin Edwards",
        "authorProfileImageUrl": "https://yt3.ggpht.com/ytc/AAUvwngz1mU5zD3QHSRVU3jXTEZApnkYsmAzCKFXxUyD1w=s48-c-k-c0x00ffffff-no-rj",
        "authorChannelUrl": "http://www.youtube.com/channel/UCO-oPQJCpNw87M6YbcuuFMw",
        "authorChannelId": {
          "value": "UCO-oPQJCpNw87M6YbcuuFMw"
        },
        "canRate": true,
        "viewerRating": "none",
        "likeCount": 0,
        "publishedAt": "2021-05-10T07:25:36Z",
        "updatedAt": "2021-05-10T07:25:36Z"
      }
    },
    {
      "kind": "youtube#comment",
      "etag": "pbfhdpIgB5QCKnr4Inkm_U2wbjQ",
      "id": "UgygOOysmSAraKnx81h4AaABAg",
      "snippet": {
        "textDisplay": "Y'know Max, you COULD have just run 5k steps in Aerith's garden, checked what the Materia did, and moved on. Or, maybe, look up an online guide, since by now I'm sure SOMEONE has posted one.",
        "textOriginal": "Y'know Max, you COULD have just run 5k steps in Aerith's garden, checked what the Materia did, and moved on. Or, maybe, look up an online guide, since by now I'm sure SOMEONE has posted one.",
        "authorDisplayName": "Soma Cruz the Demigod of Balance",
        "authorProfileImageUrl": "https://yt3.ggpht.com/ytc/AAUvwnilg2dkOBvJqeTbW34CBoxURHLWv78fnbCRkArv=s48-c-k-c0x00ffffff-no-rj",
        "authorChannelUrl": "http://www.youtube.com/channel/UCNaiemmWvNbzfaQm5e3hyqA",
        "authorChannelId": {
          "value": "UCNaiemmWvNbzfaQm5e3hyqA"
        },
        "canRate": true,
        "viewerRating": "none",
        "likeCount": 0,
        "publishedAt": "2021-05-07T02:21:29Z",
        "updatedAt": "2021-05-07T02:21:29Z"
      }
    }
  ]
}

2. YouTube 動画のコメントを MeCab で処理する

次に、抽出したコメントに対して形態素解析をかけたいと思います。

まず仮想環境で下記を実行し、MeCab を使える様準備します。

$ brew install mecab
$ brew install mecab-ipadic
$ pip install mecab-python3

基本編:単一コメント取得〜形態素解析

MeCab の準備が済んだら下記の様に

import os
import googleapiclient.discovery
import MeCab

def main():
    # Disable OAuthlib's HTTPS verification when running locally.
    # *DO NOT* leave this option enabled in production.
    os.environ["OAUTHLIB_INSECURE_TRANSPORT"] = "1"

    api_service_name = "youtube"
    api_version = "v3"
    DEVELOPER_KEY = "YOUR_API_KEY"

    youtube = googleapiclient.discovery.build(
        api_service_name, api_version, developerKey = DEVELOPER_KEY)

    # コメント ID を指定してコメントを取得
    request = youtube.comments().list(
        part="id,snippet",
        id="UgzKZhtc3fX6JgX6p5p4AaABAg" # コメント ID 
    )
    response = request.execute()

    # 返された JSON からコメントの文章を取得し text に保存
    text = response['items'][0]['snippet']['textOriginal']
    
    m = MeCab.Tagger()
 
    node = m.parseToNode(text)
    text_after = []
    while node:
        words.append(node.surface)
        node = node.next

    print('処理前: '+str(text)) # MeCab 処理前の text
    print('処理後: '+str(text_after)) # MeCab 処理を行なった後の text
    
if __name__ == "__main__":
    main()

狩野英孝さんの動画のコメントで、上記のコードを実行すると下記の結果を返してくれます。

処理前: ここ最近英孝ちゃんの動画みてたらいつの間にか日付け変わってるんだけど笑
処理前: ['', 'ここ', '最近', '英孝', 'ちゃん', 'の', '動画', 'み', 'て', 'たら', 'いつの間にか', '日', '付け', '変わっ', 'てる', 'ん', 'だ', 'けど', '笑', '']

応用編:複数コメント取得〜頻出単語の表出

YouTube Data API でコメントスレッドを取得し、それを MeCab の処理に欠けて出現数の多い単語を抽出してみます。

import os
import googleapiclient.discovery
import MeCab
import collections

def main():
    # Disable OAuthlib's HTTPS verification when running locally.
    # *DO NOT* leave this option enabled in production.
    os.environ["OAUTHLIB_INSECURE_TRANSPORT"] = "1"

    api_service_name = "youtube"
    api_version = "v3"
    DEVELOPER_KEY = "YOUR_API_KEY"

    youtube = googleapiclient.discovery.build(
        api_service_name, api_version, developerKey = DEVELOPER_KEY)

    # コメントスレッドの取得
    request = youtube.commentThreads().list(
        part="id,replies,snippet",
        maxResults=100, # 最大取得コメントスレッド数
        videoId="jsRR_ZimvAo", # 動画 ID
        order="relevance" # 関連性の高い順にコメントスレッドを取得
    )
    response = request.execute()

    comment_list = []
    for item in response['items']:

        comment_list.append(item['snippet']['topLevelComment']['snippet']['textOriginal'])
        if 'replies' in item.keys():
            for reply in item['replies']['comments']:

                comment_list.append(reply['snippet']['textOriginal'])
    
    # MeCab の処理
    comment_particles = []
    for comment in comment_list:
        m = MeCab.Tagger()
    
        node = m.parseToNode(comment)
        while node:
            if len(node.surface) > 0: # ''は処理から除外
                hinshi = node.feature.split(',')[0]
                if hinshi in ['名詞','形容詞']: # 名詞か形容詞に絞る
                    comment_particles.append(node.surface)
            
            node = node.next

    c = collections.Counter(comment_particles)
    
    # 出現数順に print
    for i in c.most_common(30):
        print(i)


if __name__ == "__main__":
    main()

お笑い芸人のさまぁ〜ずとぺこぱの動画なので下記の様な感じでタプルが返ってきます。

('シュウ', 23)
('ペイ', 23)
('さん', 21)
('笑', 17)
('好き', 11)
('ちゃん', 10)
('シュウペイ', 9)
('の', 9)
('ん', 9)
('ぺこぱ', 9)
('企画', 9)
('お前', 9)
('ツッコミ', 8)
('~', 8)
('寺', 7)
('かわいい', 7)
('最高', 7)
('松陰', 6)
('ショック', 6)
('回', 6)
('純粋', 6)
('人', 6)
('俺', 6)
('いい', 5)
('www', 5)
('w', 5)
('面白い', 5)
('ww', 5)
('❤', 5)
('ずさん', 4)

不自然なところで単語が切れてしまったりするのが気になりますが、とりあえずこんな風なことができるということで!

サーチコンソールの「URL が Google に認識されていません」を robots.txt の作成で解決

エラー「インデックス登録リクエストに失敗しました」

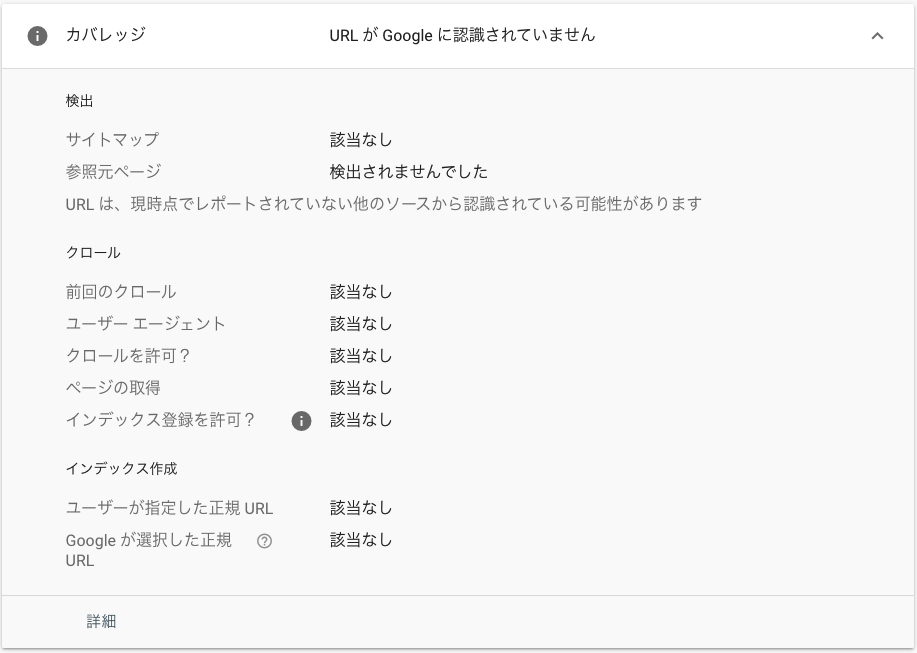
今回の問題は Google のサーチコンソールで「インデックス登録をリクエスト」をクリックした際に「インデックス登録リクエストに失敗しました」と表示され、下記の症状が出るというもの。

  • ステータスは「URL が Google に登録されていません」と表示される。
  • カバレッジは「URL が Google に認識されていません」と表示され具体的な原因がわからない。

解決方法

色々調べてみたところ robots.txt を作成する必要がある様です。

robots.txt というと、通常はサイトに対するクロールを拒否する目的で設定することが多そうですが、少なくとも Google サーチコンソールではクロールして欲しい場合でも作成し、明示的に許可する必要がある様です。

robots.txt の作成

robots.txt のファイルの内容としてはとりあえず下記にしておけば大丈夫そうです。

User-agent: *
Allow: /

Nginx での robots.txt 設定

ここからは Nginx で robots.txt を設定する方法ですが、robots.txt をルートディレクトリに配置し、設定ファイルに下記の形で記述します。

location = /robots.txt {
        alias /ルートディレクトリのパス/robots.txt;
}

URL に「/robots.txt」が含まれる場合にサーバー上の robots.txt を参照するという意味です。

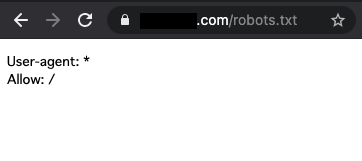
ブラウザの URL で「ドメイン名/robots.txt」を叩いた時に下記の様に表示されれば大丈夫なはずです。

ファイルの変更の反映

Nginx の設定ファイルを色々いじって、Nginx を restart してもうまく反映されない様な場合は、Chrome のシークレットモードやブラウザのキャッシュを削除して再度試してみると反映されたりします。

robots.txt テスターで robots.txt ファイルを Google へ送信

過去に Google のクロールを受け付けない形の robots.txt を Google 側で認識してしまっている場合、その後ファイルを編集してインデックス登録のリクエストを行っても引き続きエラーが出てしまいます。

この場合、robots.txt テスターから編集後の robots.txt を Google に送信し、認識してもらう必要があります。

Google Search Console – robots.txt テスター

注意点

Google サーチコンソールでドメインプロパティの登録しかない場合、対象プロパティを選択する際にサイトが表示されず robots.txt テスターを使うことができません。この場合一度 URL プレフィックスプロパティも登録する必要があります。

【ログ】Ubuntu 20.04: sudo certbot –nginx -d example.com -d www.example.com

  • 実行コマンド:sudo certbot –nginx -d example.com -d www.example.com
  • 実行日:2021/05/09
  • 実行環境:Ubuntu 20.04
$ sudo certbot --nginx -d example.com -d www.example.com
Saving debug log to /var/log/letsencrypt/letsencrypt.log
Plugins selected: Authenticator nginx, Installer nginx
Enter email address (used for urgent renewal and security notices) (Enter 'c' to
cancel): example@gmail.com

- - - - - - - - - - - - - - - - - - - - - - - - - - - - - - - - - - - - - - - -
Please read the Terms of Service at
https://letsencrypt.org/documents/LE-SA-v1.2-November-15-2017.pdf. You must
agree in order to register with the ACME server at
https://acme-v02.api.letsencrypt.org/directory
- - - - - - - - - - - - - - - - - - - - - - - - - - - - - - - - - - - - - - - -
(A)gree/(C)ancel: A

- - - - - - - - - - - - - - - - - - - - - - - - - - - - - - - - - - - - - - - -
Would you be willing to share your email address with the Electronic Frontier
Foundation, a founding partner of the Let's Encrypt project and the non-profit
organization that develops Certbot? We'd like to send you email about our work
encrypting the web, EFF news, campaigns, and ways to support digital freedom.
- - - - - - - - - - - - - - - - - - - - - - - - - - - - - - - - - - - - - - - -
(Y)es/(N)o: N
Obtaining a new certificate
Performing the following challenges:
http-01 challenge for graffuhs.com
http-01 challenge for www.graffuhs.com
Waiting for verification...
Cleaning up challenges
Deploying Certificate to VirtualHost /etc/nginx/sites-enabled/graffuhs.com

Please choose whether or not to redirect HTTP traffic to HTTPS, removing HTTP access.
- - - - - - - - - - - - - - - - - - - - - - - - - - - - - - - - - - - - - - - -
1: No redirect - Make no further changes to the webserver configuration.
2: Redirect - Make all requests redirect to secure HTTPS access. Choose this for
new sites, or if you're confident your site works on HTTPS. You can undo this
change by editing your web server's configuration.
- - - - - - - - - - - - - - - - - - - - - - - - - - - - - - - - - - - - - - - -
Select the appropriate number [1-2] then [enter] (press 'c' to cancel): 2
Redirecting all traffic on port 80 to ssl in /etc/nginx/sites-enabled/graffuhs.com

- - - - - - - - - - - - - - - - - - - - - - - - - - - - - - - - - - - - - - - -
Congratulations! You have successfully enabled https://graffuhs.com and
https://www.graffuhs.com

You should test your configuration at:
https://www.ssllabs.com/ssltest/analyze.html?d=graffuhs.com
https://www.ssllabs.com/ssltest/analyze.html?d=www.graffuhs.com
- - - - - - - - - - - - - - - - - - - - - - - - - - - - - - - - - - - - - - - -

IMPORTANT NOTES:
 - Congratulations! Your certificate and chain have been saved at:
   /etc/letsencrypt/live/graffuhs.com/fullchain.pem
   Your key file has been saved at:
   /etc/letsencrypt/live/graffuhs.com/privkey.pem
   Your cert will expire on 2021-08-07. To obtain a new or tweaked
   version of this certificate in the future, simply run certbot again
   with the "certonly" option. To non-interactively renew *all* of
   your certificates, run "certbot renew"
 - Your account credentials have been saved in your Certbot
   configuration directory at /etc/letsencrypt. You should make a
   secure backup of this folder now. This configuration directory will
   also contain certificates and private keys obtained by Certbot so
   making regular backups of this folder is ideal.
 - If you like Certbot, please consider supporting our work by:

   Donating to ISRG / Let's Encrypt:   https://letsencrypt.org/donate
   Donating to EFF:                    https://eff.org/donate-le

【ログ】Ubuntu 20.04: sudo apt install certbot python3-certbot-nginx

  • 実行コマンド:sudo apt install certbot python3-certbot-nginx
  • 実行日:2021/05/09
  • 実行環境:Ubuntu 20.04
$ sudo apt install certbot python3-certbot-nginx
[sudo] password for ユーザー名: 
Reading package lists... Done
Building dependency tree       
Reading state information... Done
The following additional packages will be installed:
  python3-acme python3-certbot python3-configargparse python3-future python3-icu python3-josepy python3-mock python3-parsedatetime python3-pbr python3-pyparsing
  python3-requests-toolbelt python3-rfc3339 python3-tz python3-zope.component python3-zope.event python3-zope.hookable
Suggested packages:
  python3-certbot-apache python-certbot-doc python-acme-doc python-certbot-nginx-doc python-future-doc python-mock-doc python-pyparsing-doc
The following NEW packages will be installed:
  certbot python3-acme python3-certbot python3-certbot-nginx python3-configargparse python3-future python3-icu python3-josepy python3-mock python3-parsedatetime
  python3-pbr python3-pyparsing python3-requests-toolbelt python3-rfc3339 python3-tz python3-zope.component python3-zope.event python3-zope.hookable
0 upgraded, 18 newly installed, 0 to remove and 29 not upgraded.
Need to get 1264 kB of archives.
After this operation, 6657 kB of additional disk space will be used.
Do you want to continue? [Y/n] Y
Get:1 http://jp.archive.ubuntu.com/ubuntu focal/universe amd64 python3-josepy all 1.2.0-2 [28.1 kB]
Get:2 http://jp.archive.ubuntu.com/ubuntu focal/main amd64 python3-pbr all 5.4.5-0ubuntu1 [64.0 kB]
Get:3 http://jp.archive.ubuntu.com/ubuntu focal/universe amd64 python3-mock all 3.0.5-1build1 [25.6 kB]
Get:4 http://jp.archive.ubuntu.com/ubuntu focal/universe amd64 python3-requests-toolbelt all 0.8.0-1.1 [35.2 kB]
Get:5 http://jp.archive.ubuntu.com/ubuntu focal/main amd64 python3-tz all 2019.3-1 [24.4 kB]
Get:6 http://jp.archive.ubuntu.com/ubuntu focal/main amd64 python3-rfc3339 all 1.1-2 [6808 B]
Get:7 http://jp.archive.ubuntu.com/ubuntu focal/universe amd64 python3-acme all 1.1.0-1 [29.6 kB]
Get:8 http://jp.archive.ubuntu.com/ubuntu focal/universe amd64 python3-configargparse all 0.13.0-2 [22.6 kB]
Get:9 http://jp.archive.ubuntu.com/ubuntu focal/main amd64 python3-future all 0.18.2-2 [336 kB]
Get:10 http://jp.archive.ubuntu.com/ubuntu focal/universe amd64 python3-parsedatetime all 2.4-5 [32.6 kB]
Get:11 http://jp.archive.ubuntu.com/ubuntu focal/universe amd64 python3-zope.hookable amd64 5.0.0-1build1 [11.2 kB]
Get:12 http://jp.archive.ubuntu.com/ubuntu focal/universe amd64 python3-zope.event all 4.4-2build1 [7704 B]
Get:13 http://jp.archive.ubuntu.com/ubuntu focal/universe amd64 python3-zope.component all 4.3.0-3 [38.3 kB]
Get:14 http://jp.archive.ubuntu.com/ubuntu focal-updates/universe amd64 python3-certbot all 0.40.0-1ubuntu0.1 [223 kB]
Get:15 http://jp.archive.ubuntu.com/ubuntu focal-updates/universe amd64 certbot all 0.40.0-1ubuntu0.1 [17.9 kB]
Get:16 http://jp.archive.ubuntu.com/ubuntu focal/main amd64 python3-pyparsing all 2.4.6-1 [61.3 kB]
Get:17 http://jp.archive.ubuntu.com/ubuntu focal-updates/universe amd64 python3-certbot-nginx all 0.40.0-0ubuntu0.1 [50.8 kB]
Get:18 http://jp.archive.ubuntu.com/ubuntu focal/main amd64 python3-icu amd64 2.4.2-0ubuntu3 [250 kB]
Fetched 1264 kB in 0s (4485 kB/s)    
Selecting previously unselected package python3-josepy.
(Reading database ... 152075 files and directories currently installed.)
Preparing to unpack .../00-python3-josepy_1.2.0-2_all.deb ...
Unpacking python3-josepy (1.2.0-2) ...
Selecting previously unselected package python3-pbr.
Preparing to unpack .../01-python3-pbr_5.4.5-0ubuntu1_all.deb ...
Unpacking python3-pbr (5.4.5-0ubuntu1) ...
Selecting previously unselected package python3-mock.
Preparing to unpack .../02-python3-mock_3.0.5-1build1_all.deb ...
Unpacking python3-mock (3.0.5-1build1) ...
Selecting previously unselected package python3-requests-toolbelt.
Preparing to unpack .../03-python3-requests-toolbelt_0.8.0-1.1_all.deb ...
Unpacking python3-requests-toolbelt (0.8.0-1.1) ...
Selecting previously unselected package python3-tz.
Preparing to unpack .../04-python3-tz_2019.3-1_all.deb ...
Unpacking python3-tz (2019.3-1) ...
Selecting previously unselected package python3-rfc3339.
Preparing to unpack .../05-python3-rfc3339_1.1-2_all.deb ...
Unpacking python3-rfc3339 (1.1-2) ...
Selecting previously unselected package python3-acme.
Preparing to unpack .../06-python3-acme_1.1.0-1_all.deb ...
Unpacking python3-acme (1.1.0-1) ...
Selecting previously unselected package python3-configargparse.
Preparing to unpack .../07-python3-configargparse_0.13.0-2_all.deb ...
Unpacking python3-configargparse (0.13.0-2) ...
Selecting previously unselected package python3-future.
Preparing to unpack .../08-python3-future_0.18.2-2_all.deb ...
Unpacking python3-future (0.18.2-2) ...
Selecting previously unselected package python3-parsedatetime.
Preparing to unpack .../09-python3-parsedatetime_2.4-5_all.deb ...
Unpacking python3-parsedatetime (2.4-5) ...
Selecting previously unselected package python3-zope.hookable.
Preparing to unpack .../10-python3-zope.hookable_5.0.0-1build1_amd64.deb ...
Unpacking python3-zope.hookable (5.0.0-1build1) ...
Selecting previously unselected package python3-zope.event.
Preparing to unpack .../11-python3-zope.event_4.4-2build1_all.deb ...
Unpacking python3-zope.event (4.4-2build1) ...
Selecting previously unselected package python3-zope.component.
Preparing to unpack .../12-python3-zope.component_4.3.0-3_all.deb ...
Unpacking python3-zope.component (4.3.0-3) ...
Selecting previously unselected package python3-certbot.
Preparing to unpack .../13-python3-certbot_0.40.0-1ubuntu0.1_all.deb ...
Unpacking python3-certbot (0.40.0-1ubuntu0.1) ...
Selecting previously unselected package certbot.
Preparing to unpack .../14-certbot_0.40.0-1ubuntu0.1_all.deb ...
Unpacking certbot (0.40.0-1ubuntu0.1) ...
Selecting previously unselected package python3-pyparsing.
Preparing to unpack .../15-python3-pyparsing_2.4.6-1_all.deb ...
Unpacking python3-pyparsing (2.4.6-1) ...
Selecting previously unselected package python3-certbot-nginx.
Preparing to unpack .../16-python3-certbot-nginx_0.40.0-0ubuntu0.1_all.deb ...
Unpacking python3-certbot-nginx (0.40.0-0ubuntu0.1) ...
Selecting previously unselected package python3-icu.
Preparing to unpack .../17-python3-icu_2.4.2-0ubuntu3_amd64.deb ...
Unpacking python3-icu (2.4.2-0ubuntu3) ...
Setting up python3-configargparse (0.13.0-2) ...
Setting up python3-requests-toolbelt (0.8.0-1.1) ...
Setting up python3-icu (2.4.2-0ubuntu3) ...
Setting up python3-zope.event (4.4-2build1) ...
Setting up python3-pbr (5.4.5-0ubuntu1) ...
update-alternatives: using /usr/bin/python3-pbr to provide /usr/bin/pbr (pbr) in auto mode
Setting up python3-tz (2019.3-1) ...
Setting up python3-mock (3.0.5-1build1) ...
Setting up python3-zope.hookable (5.0.0-1build1) ...
Setting up python3-pyparsing (2.4.6-1) ...
Setting up python3-josepy (1.2.0-2) ...
Setting up python3-future (0.18.2-2) ...
update-alternatives: using /usr/bin/python3-futurize to provide /usr/bin/futurize (futurize) in auto mode
update-alternatives: using /usr/bin/python3-pasteurize to provide /usr/bin/pasteurize (pasteurize) in auto mode
Setting up python3-rfc3339 (1.1-2) ...
Setting up python3-parsedatetime (2.4-5) ...
Setting up python3-zope.component (4.3.0-3) ...
Setting up python3-acme (1.1.0-1) ...
Setting up python3-certbot (0.40.0-1ubuntu0.1) ...
Setting up certbot (0.40.0-1ubuntu0.1) ...
Created symlink /etc/systemd/system/timers.target.wants/certbot.timer → /lib/systemd/system/certbot.timer.
Setting up python3-certbot-nginx (0.40.0-0ubuntu0.1) ...
Processing triggers for man-db (2.9.1-1) ...
$ 

ローカル環境の Django を本番環境(Ubuntu)へデプロイする方法

Mac のローカル環境で作成した Django プロジェクトをさくらのVPSで用意した Ubuntu 環境へ反映する際の流れをメモしています。

▶︎ Django のおすすめ VPS(仮装専用サーバー)はOSから決めるべし

下記が完了していることを想定しています。

  • Web サーバーの設定が完了済み(筆者は Nginx を使用)
  • 仮想環境を作るディレクトリが決めてある
  1. データベースを本番環境にコピーする
    • ローカル環境での作業
    • 本番環境での作業
  2. ローカル環境のパッケージを本番環境で再現
    • requirements.txt の作成
    • requirements.txt を本番環境へコピー
    • 本番環境で Python 仮想環境を作成
    • requirements.txt によるパッケージインストール
  3. settings.py の編集
    • ファイルを分割する必要性
    • 開発環境の runserver 実行時に settings_dev.py を指定
    • settings.py(本番環境用)の編集
  4. Django ソースコードを本番環境に配置
    • 本番環境への git のインストール
    • リモートリポジトリから本番環境へファイルをコピー
  5. gunicorn のインストール
  6. データベースのログイン情報を別ファイル記述
  7. 静的ファイルの配置

1. データベースを本番環境にコピーする

検証環境で準備したデータベース、テーブル、そしてデータを本番環境でも反映します。

ここはうまくやれば一行スクリプト書いて終了する方法もある様ですが、色々とエラーが出て逆にめんどくさそうだったのでステップバイステップでやっていきます。

ローカル環境での作業

まずローカル環境でコマンド「mysqldump データベース名 > dump.txt」を実行し、dump ファイルを作成します。

% mysqldump データベース名 > dump.txt                                                              
%

それを FTP か何かで本番環境へアップロードします。

本番環境での作業

本番環境に接続し、本番環境の MySQL でデータベースを作成します。

mysql> create database データベース名;

そしてコマンド「sudo mysql データベース名 < dump.txt」を実行します。

$ sudo mysql データベース名 < dump.txt
$

これで本番環境の MySQL にもローカル環境と同じデータベース、テーブル、そしてデータがコピーされました。

2. ローカル環境のパッケージを本番環境で再現

ローカル環境の Python 関連パッケージを本番環境でも再現するため、ローカル環境で requirements.txt ファイルを作成し、それを元に本番環境でパッケージインストールをさせます。

requirements.txt の作成

ローカル環境の Python 仮想環境へ入り、コマンド「pip freeze > requirements.txt」を実行します。

% source bin/activate
% pip freeze > requirements.txt

requirements.txt を本番環境へコピー

コマンド「scp requirements.txt 本番環境のユーザー名@本番環境のホスト名(もしくは IP アドレス):保存先のディレクトリ」を実行します。

だいぶ長いですが下記の例だとすると。。。

  • 本番環境のユーザー名: vpsadmin
  • 本番環境のホスト名: xx1-234-56789.vs.sakura.ne.jp
  • 保存先のディレクトリ: /var/www/example.com/html

下記の様になります。

scp requirements.txt vpsadmin@xx1-234-56789.vs.sakura.ne.jp:/var/www/example.com/html

無事本番環境に requirements.txt がコピーされました。

$ ls
requirements.txt

本番環境で Python 仮想環境を作成

本番環境のディレクトリへ移動し、Python の仮想環境を作成します。

$ python3.9 -m venv pythonvenv
$ ls
pythonvenv  requirements.txt

requirements.txt によるパッケージインストール

本番環境の Python 仮想環境に入った状態で、コマンド「pip install -r requirements.txt」を実行します。

(pythonvenv) $ pip install -r requirements.txt

すると requirements.txt の内容を元に Django を含めローカル環境で使っていたものと同じパッケージがインストールされます。

3. settings.py の編集

ファイルを分割する必要性

settings.py は本番環境と開発環境で内容が異なる部分が出てくるので、下記の様にファイルを分ける必要があります。(ファイル名は任意)

  • settings_common.py:開発環境と本番環境で共通の部分を記述
  • settings.py:本番環境でのみ適用する部分を記述
  • settings_dev.py:開発環境でのみ適用する部分を記述

settings.py と settings_dev.py それぞれに「from .settings_common import *」と記述し、共通部分を settings_common.py から読み込む様設定します。

開発環境の runserver 実行時に settings_dev.py を指定

runserver 実行時、デフォルトでは settings.py が設定ファイルとして読み込まれますが、今後開発環境(ローカル環境)では settings_dev.py を使う必要があります。

そのため、今後開発環境で runserver を実行する際は settings_dev.py を「runserver –settings=プロジェクトディレクトリ名.settings_dev」の形式で渡して実行します。

(pythonvenv) % python manage.py runserver --settings=some_project.settings_dev

settings.py(本番環境用)の編集

DEBUG の変更

False に変更

DEBUG = False

ALLOWED_HOSTS の変更

ドメイン名を設定。

ALLOWED_HOSTS = ['example.com']

Web サーバーで www.example.com から example.com のリダイレクトを行っていれば example.com のみを設定するだけで大丈夫です。

静的ファイルの本番環境での配置場所

STATIC_ROOT = '/var/www/examlpe.com/html/static'

4. Django ソースコードを本番環境に配置

本番環境への git のインストール(インストール済みの場合は不要)

本番環境でコマンド「sudo apt update」を実行しパッケージリストを更新、その後「sudo apt install git」で git をインストールします。

$ sudo apt update
$ sudo apt install git
Reading package lists... Done
Building dependency tree       
Reading state information... Done
git is already the newest version (1:2.25.1-1ubuntu3.1).
git set to manually installed.
0 upgraded, 0 newly installed, 0 to remove and 18 not upgraded.

リモートリポジトリから本番環境へファイルをコピー

プロジェクトフォルダをリポジトリに設定しているので、プロジェクトフォルダを配置したい場所へ移動した上で git clone を実行します。

$ git clone https://github.com/ユーザー名/リポジトリ名.git

これで本番環境にもプロジェクトフォルダがコピーされました。

ローカル環境からリモートリポジトリへファイルを反映させる方法はこちら↓

Github で開発ローカル → リモートリポジトリ → 本番ローカルに反映させる手順

5. gunicorn のインストール

本番環境でのみ必要となるものとして、アプリケーションサーバーがあります。今回は gunicorn を使います。

Python 仮想環境内でアプリケーションサーバーの gunicorn をインストールします。

(pythonvenv) $ pip install gunicorn

socket の待ち受けを開始します。これをしないとアクセス時に 502 Bad Gateway のエラーになります。

(pythonvenv) $ systemctl start example_sub.socket
(pythonvenv) $ systemctl start example_sub.service

今後作業する際は何かにつけて「pkill gunicorn」で gunicorn を終わらせた方が良いです。エラーが起きた時にいくらコードを修正しても治らないまま数時間経って、「pkill gunicorn」一発で治ったこともありました。

6. データベースのログイン情報を別ファイルに記述

MySQL のデータベースを使用したんですが、Git で管理する性質上、settings.py にデータベースのユーザー名とパスワード直接記述するのは危なそうなので、別ファイルに分けました。

Git で管理しない local_settings.py というファイル(ファイル名は自由)を作成し、そちらに機密情報をまとめます。

.gitignore ファイルに local_settings.py を含めた上で、local_settings.py を作ります。

# local_settings.py

DB_USER = 'DB ユーザー名'
DB_PASSWORD = 'DB パスワード'

その上で settings.py にそれら情報を import し、DATABASES の設定に使います。

# settings.py

from .local_settings import DB_USER as dbusr
from .local_settings import DB_PASSWORD as dbpw

DATABASES = {
    'default': {
        'ENGINE': 'django.db.backends.mysql',
        'NAME': 'sa',
        'USER': dbusr,
        'PASSWORD': dbpw,
        'HOST': '',
        'PORT': '',
    }
}

上記と別に、下記の様にしてサーバーの環境設定から取ってくる方法もあると思いますが、環境設定の上手い設定方法がわからなかったので今回はやっていないです。

DATABASES = {
    'default': {
        'ENGINE': 'django.db.backends.mysql',
        'NAME': 'データベース名',
        'USER': os.environ.get('DB_USER'),
        'PASSWORD': os.environ.get('DB_PASSWORD'),
        'HOST': '',
        'PORT': '',
    }
}

7. 静的ファイルの配置

コマンド「python manage.py collectstatic」を実行し、settings.py で STATIC_ROOT に設定したパスに静的ファイルを集約します。

$ python manage.py collectstatic

これでとりあえず本番環境でも動くと思います。

▶︎ Django のおすすめ VPS(仮装専用サーバー)はOSから決めるべし

さくらインターネットの DNS 設定のゾーン情報を理解したい

さくらインターネットのドメイン管理画面でドメインのゾーン情報をヘルプページを見ながらなんとか設定しました。

ただ、「CNAME」や「MX」など、それぞれの項目が何を意味しているのかわからなかったので調べたことをまとめます。

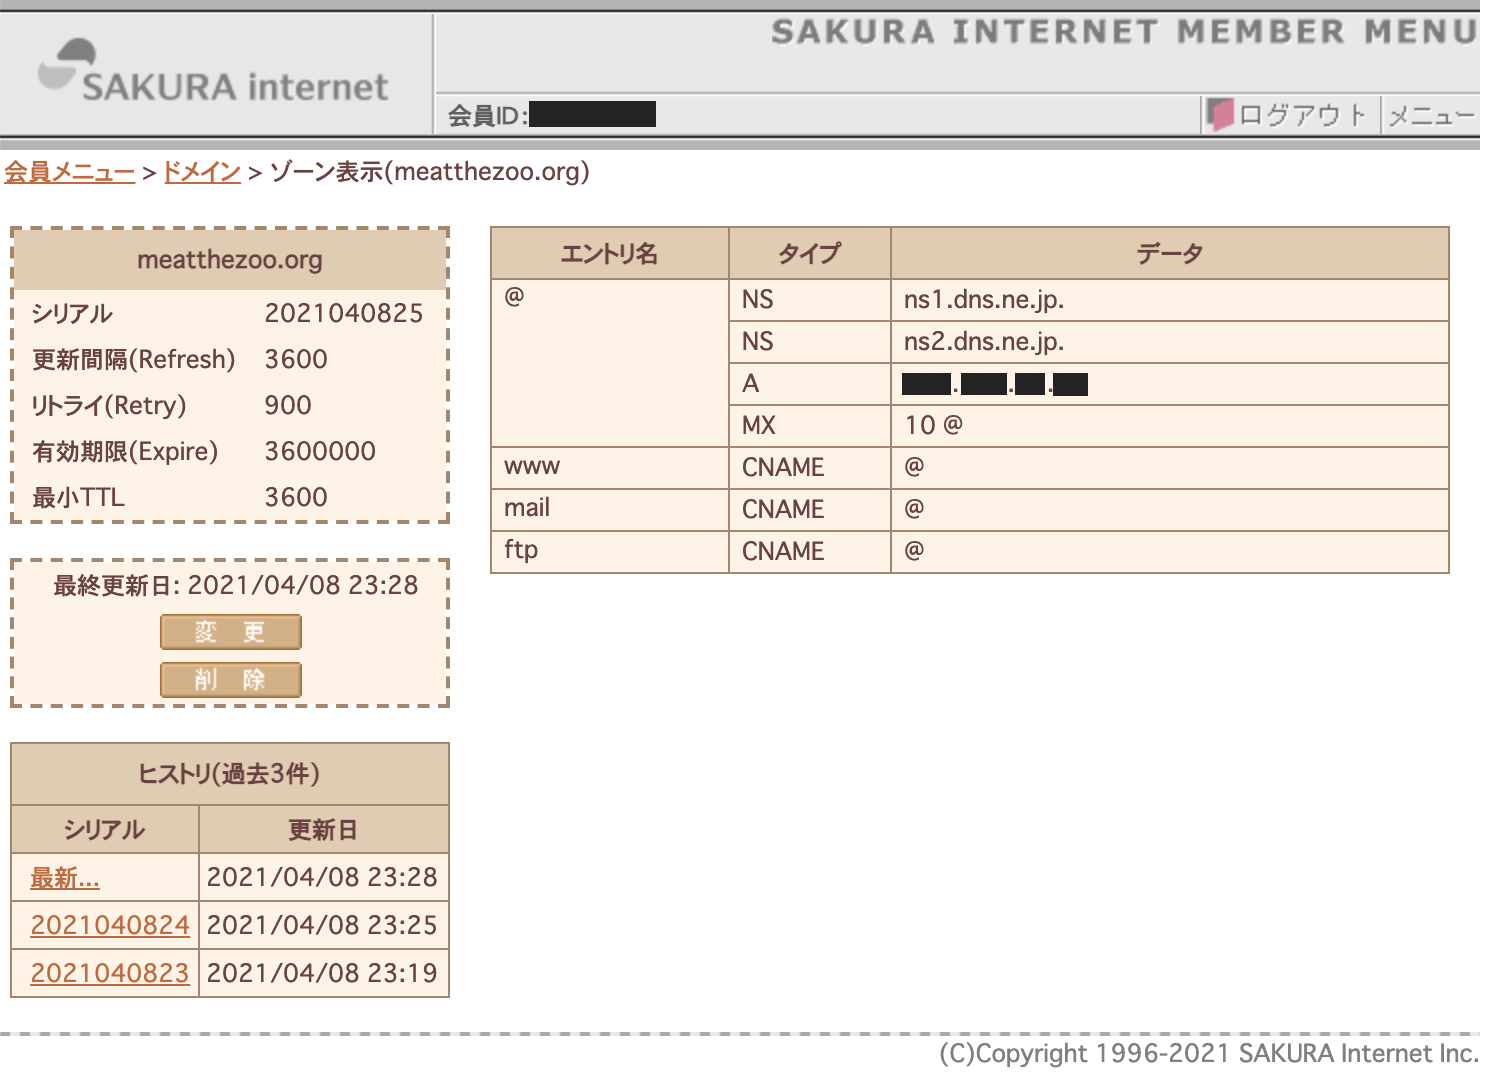
さくらインターネットの管理画面で設定した内容は下記の画像の通り。ドメイン名「meatthezoo.com」に対して設定しました。

設定内容

簡単ですがそれぞれの設定の意味は下記の通り。

エントリ名タイプデータ説明
@NSns1.dns.ne.jp.「meatthezoo.com」に対してさくらインターネット運営の権威DNSサーバー「ns1.dns.ne.jp.」を指定。
@NSns2.dns.ne.jp.「meatthezoo.com」に対してさくらインターネット運営の権威DNSサーバー「ns2.dns.ne.jp.」を指定。
@A123.456.78.90「meatthezoo.com」を IP アドレス「123.456.78.90」で使用する。
@MX10 @「meatthezoo.com」をメールサーバーに使用する。優先度を 10 に設定。
wwwCNAME@サブドメイン「www」を使用した場合にホスト「meatthezoo.com」と同じ設定を適用する。
mailCNAME@サブドメイン「mail」を使用した場合にホスト「meatthezoo.com」と同じ設定を適用する。
ftpCNAME@サブドメイン「ftp」を使用した場合にホスト「meatthezoo.com」と同じ設定を適用する。

たびたび出てくる「@」は設定対象のドメイン自身(今回の場合 meatthezoo.com)を表すそうです。

タイプとは

「タイプ」項目に登場した文字列の意味は下記の通りです。他にも種類がある様ですがとりあえず今回のゾーン情報の設定に出てきたものだけまとめます。

タイプ意味
NSゾーン情報を管理するネームサーバーのサーバー名を定義するレコード。ホスト(FQDN)をAレコードとして設定されていることが必要。
AIPv4でホスト名とIPアドレスの関連づけを定義するレコード。「www」などのホスト名を入力し、VALUEにグローバルIPアドレスを入力することによって、サーバーへの名前解決が行われる。
CNAME正規ホスト名に対する別名を定義するレコード。ホスト(FQDN)をAレコードとして設定されていることが必要。
MX対象ドメイン宛のメールの配送先(メールサーバ)のホスト名を定義するレコード。ホスト(FQDN)をAレコードとして設定されていることが必要。

Django のフォーム投稿を Postfix でメール送信する方法

Django で作ったサイトのフォームで受け付けた情報を自分の Gmail アカウントへ送信する様に設定します。受信については特に考慮していません。

サーバーの OS は Ubuntu 20.04 となっています。

Postfix の設定

コマンド「sudo apt install postfix」を実行し、Postfix をインストールします。

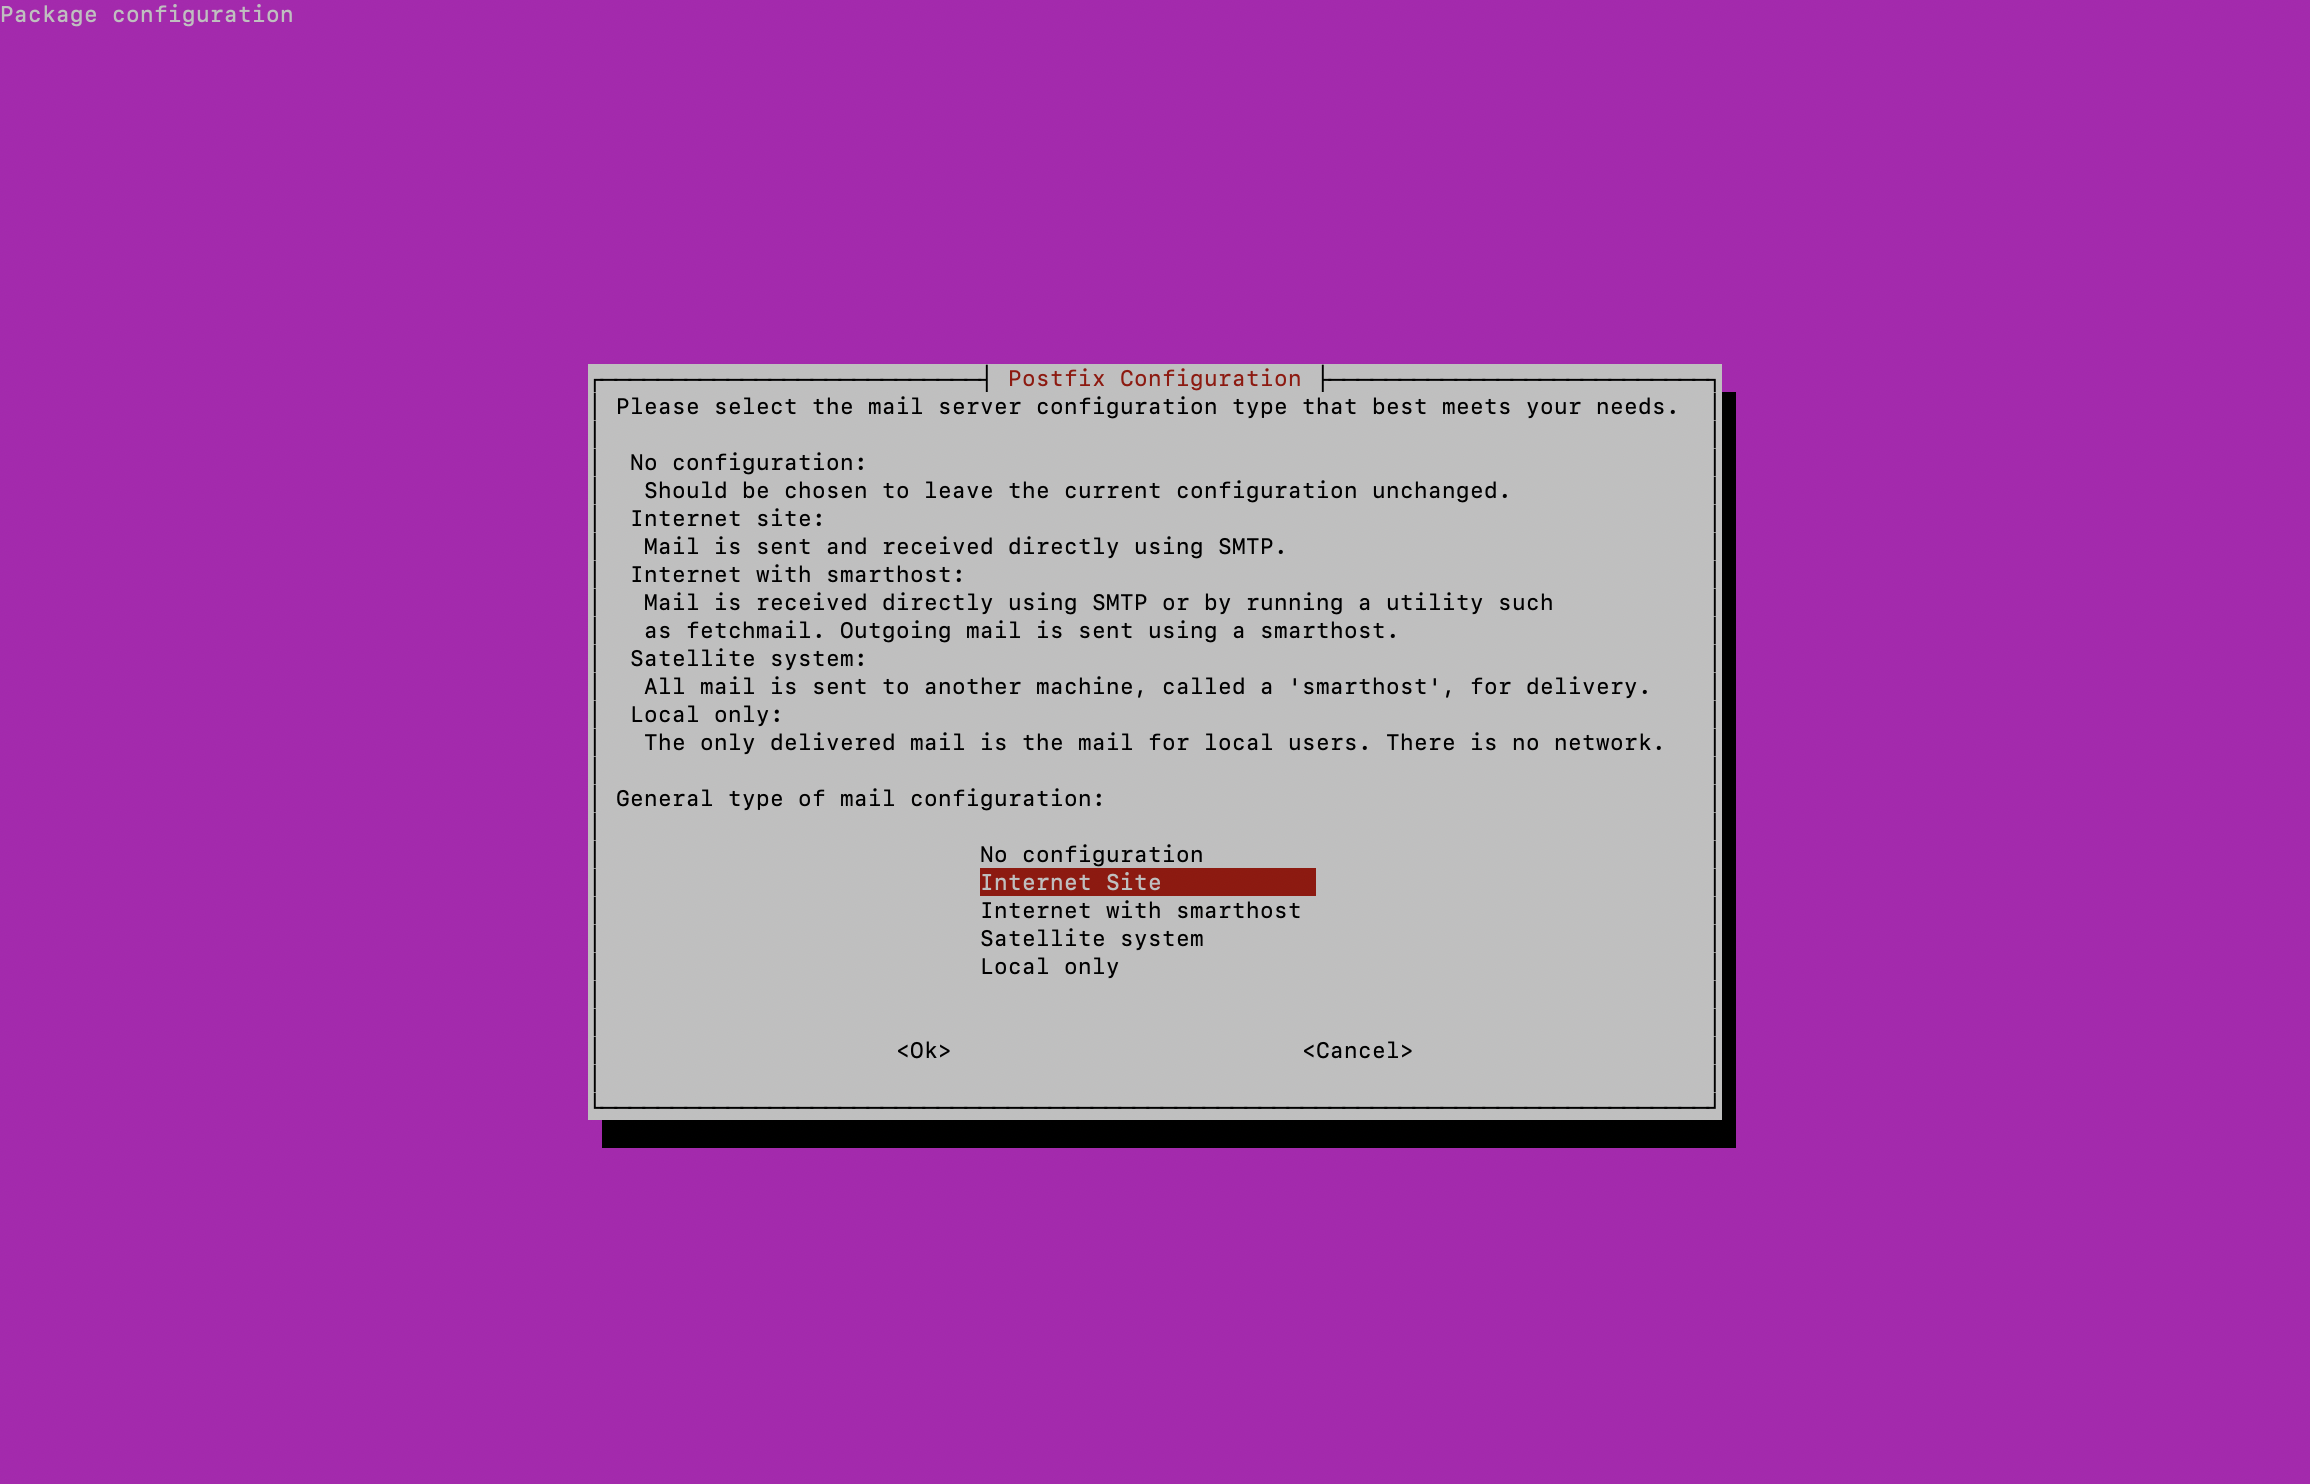
すると下記の様な画面が表示されます。

「General type of mail configuration」の文言の後にいくつか選択肢が表示されますが、No configuration を選択します。

/etc/postfix/main.cfの編集

インストールが完了したらコマンド「sudo cp /usr/share/postfix/main.cf.debian /etc/postfix/main.cf」を実行し、postconf コマンドで main.cf ファイルを編集していきます。hostname、mydomain、myorigin の3つを確認、設定します。

hostname の設定

DNS の MX レコードで指定されているホスト名を指定します。

$ sudo postconf -e "myhostname = mail.example.com"

コマンド「vi /etc/postfix/main.cf」で main.cf を確認すると「myhostname = mail.example.com」が追記されているはずです。

mydomain の設定

mydomain は hostname の値によって自動的に決まります。コマンド「postconf mydomain」を実行して確認できます。hostname からサブドメインが除外された値になっているはずです。

$ postconf mydomain
mydomain = example.com

もし上記の様な値が返ってこない場合はコマンド「sudo postconf -e “mydomain = example.com”」で明示的に main.cf に設定します。

myorigin の設定

myorigin は デフォルトでは $myhostname を参照しています。

$ postconf myorigin
myorigin = $myhostname

代わりに $mydomain を参照する様変更する必要があります。

コマンド「sudo postconf -e “myorigin = $mydomain”」だとなぜかうまく反映されなかったので「sudo vi /etc/postfix/main.cf」でファイルを開いて直接「myorigin = $mydomain」を記述しました。

$ postconf myorigin
myorigin = $mydomain

Postfix の再起動

コマンド「sudo systemctl restart postfix.service」で Postfix を再起動します。

$ sudo systemctl restart postfix.service
$ 

main.cf には下記の2行が追記されていれば Postfix の設定は完了です。

myhostname = mail.example.com
myorigin = $mydomain

Django の settings.py の編集

Django プロジェクトの settings.py に下記を設定します。

EMAIL_BACKEND = 'django.core.mail.backends.smtp.EmailBackend'
EMAIL_HOST = 'localhost'
EMAIL_PORT = 25
EMAIL_HOST_USER = ''
EMAIL_HOST_PASSWORD = ''
EMAIL_USE_TLS = False
DEFAULT_FROM_EMAIL = 'Sender <admin@example.com>'

動作確認

Django サイトのフォームで試しに投稿したところ、一応指定した G メールアカウントには届きました。

この時点で一応最低限の目的は達成されましたが、メールの暗号化とメールの認証について気になったので下記にまとめます。

メールの暗号化

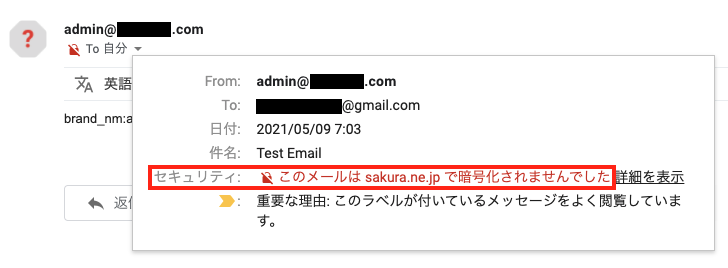
Postfix で Gmail アカウント宛に送信したメールの詳細を見てみると「このメールは sakura.ne.jp で暗号化されませんでした」と表示があります。

これを解決するには、送信先がTLS(Transport Layer Security)に対応する場合はTLSで暗号化して送信する設定を Postfix 側で適用する必要があります。

下記のコマンドで main.cf に「smtp_tls_security_level = may」と追記し、 Postfix を再起動します。

$ sudo postconf -e "smtp_tls_security_level = may"
$ sudo systemctl restart postfix.service
$ 

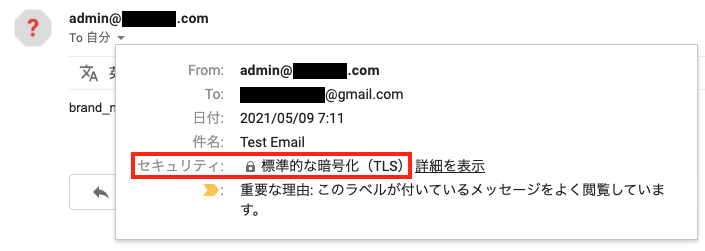
再度メールを送って同じ部分を確認してみると「標準的な暗号化(TLS)」という表示に変わりました。

これでメールの暗号化は完了です。

メールの認証

Gメールで受信したメールの送信者のアイコンにカーソルを合わせると「Gメールでは、このメールが(スパム発信者からではなく)本当に example.com から送信されたメールであることを確認できませんでした。」という文言も表示されます。

この点に関しては手間がかかりそうな気がするので追々対応した際に追記します。

【ログ】Ubuntu 20.04: sudo apt install postfix

  • 実行コマンド:sudo apt install postfix
  • 実行日:2021/05/07
  • 実行環境:Ubuntu 20.04
$ sudo apt install postfix
Reading package lists... Done
Building dependency tree       
Reading state information... Done
Suggested packages:
  procmail postfix-mysql postfix-pgsql postfix-ldap postfix-pcre postfix-lmdb postfix-sqlite sasl2-bin | dovecot-common resolvconf postfix-cdb mail-reader
  postfix-doc
The following NEW packages will be installed:
  postfix
0 upgraded, 1 newly installed, 0 to remove and 29 not upgraded.
Need to get 1198 kB of archives.
After this operation, 4540 kB of additional disk space will be used.
Get:1 http://jp.archive.ubuntu.com/ubuntu focal-updates/main amd64 postfix amd64 3.4.13-0ubuntu1 [1198 kB]
Fetched 1198 kB in 0s (4892 kB/s)
Preconfiguring packages ...
Selecting previously unselected package postfix.
(Reading database ... 151877 files and directories currently installed.)
Preparing to unpack .../postfix_3.4.13-0ubuntu1_amd64.deb ...
Unpacking postfix (3.4.13-0ubuntu1) ...
Setting up postfix (3.4.13-0ubuntu1) ...
Adding group `postfix' (GID 121) ...
Done.
Adding system user `postfix' (UID 114) ...
Adding new user `postfix' (UID 114) with group `postfix' ...
Not creating home directory `/var/spool/postfix'.
Creating /etc/postfix/dynamicmaps.cf
Adding group `postdrop' (GID 122) ...
Done.
/etc/aliases does not exist, creating it.

Postfix (main.cf) was not set up.  Start with
  cp /usr/share/postfix/main.cf.debian /etc/postfix/main.cf
.  If you need to make changes, edit /etc/postfix/main.cf (and others) as 
needed.  To view Postfix configuration values, see postconf(1).

After modifying main.cf, be sure to run 'systemctl reload postfix'.

Created symlink /etc/systemd/system/multi-user.target.wants/postfix.service → /lib/systemd/system/postfix.service.
Processing triggers for ufw (0.36-6) ...
Processing triggers for systemd (245.4-4ubuntu3.6) ...
Processing triggers for man-db (2.9.1-1) ...
Processing triggers for rsyslog (8.2001.0-1ubuntu1.1) ...
Processing triggers for libc-bin (2.31-0ubuntu9.2) ...

Django で URL のパラメータを取得する方法(クラスベースビュー)

  1. URL ディレクトリの文字列の利用の復習
  2. URL のパラメータの取得方法
    1. self.request.GET.get(パラメータキー) で取得
    2. 値が一つだけの場合
    3. 値が複数の場合
    4. 値を指定していない場合

1. URL ディレクトリの文字列の利用の復習

Django の ListView などでテンプレートに返すデータをフィルタリングする際、urls.py で設定した URL ディレクトリの文字列を取得してそれを元にすることがあると思います。

下記の様な感じで get_queryset 関数で self.kwargs から値を取り出す感じですね。

# urls.py
urlpatterns = [
    path('<str:some_code>/', views.SomeData.as_view(), name="some_data"),
]
# views.py
class SomeData(generic.ListView):
    ### 一部省略 ###
    def get_queryset(self):
        code = self.kwargs['some_code']
        return SomeDataModel.objects.filter(some_code_column=code)

ただ、今回はそうではなく URL のパラメータを「ドメイン名.com/?キー=値&キー=値」の形式で取得してそれをデータ取得に使いたいと思います。

2. URL のパラメータの取得方法

1. self.request.GET.get(パラメータキー) で取得

get_queryset 関数をオーバーライドする際に self.request.GET.get(パラメータのキー) で取得できます。

例えば「http://127.0.0.1:8000/devicelist/?brand_nm=apple&category=laptop,phone」の様な URL の場合。

「?brand_nm=apple&category=laptop,phone」の部分をビューの処理に使いたいとします。

# views.py 内 get_queryset 関数
def get_queryset(self):
    brand = self.request.GET.get('brand_nm')
    return SomeDataModel.objects.filter(brand_nm=brand)

2. 値が一つだけの場合

値が一つだけの場合(brand_nm=apple)は「self.request.GET.get(キー)」でそのまま値が一つ取得できます。

print(self.request.GET.get('brand_nm'))
# apple

3. 値が複数の場合

複数の値を「,」で繋げて URL に渡した場合(category=laptop,phone)は、「,」が含まれただけの一つの文字列になっています。

print(self.request.GET.get('category'))
# laptop, phone

なので一旦 .split(‘,’) を通してリストにしてあげる必要があります。

print(self.request.GET.get('category').split(','))
# ['laptop', 'phone']
print(self.request.GET.get('category').split(',')[0])
# laptop
print(self.request.GET.get('category').split(',')[1])
# phone

4. 値を指定していない場合

URL で渡していないキーを指定すると None が返ってきます。

print(self.request.GET.get('product_type'))
# None

Django の ModelForm でプルダウンをテーブルから取得する

やりたいこと:Django の ModelForm を作るときに、プルダウンメニューの選択肢(select option)をデータベースのテーブルから参照したい。

結論から言いますと Foreign Key を使って別のテーブルのユニークキーをフォームの選択肢として利用します。

  1. プルダウンにするカラムに models.ForeignKey を適用
  2. forms.py で ModelChoiceField を設定
  3. 任意のカラムの値を表出する様変更

1. プルダウンにするカラムに models.ForeignKey を適用

まず、models.py でプルダウン表示にしたい項目に models.ForeignKey を適用します。

別テーブルでユニークになっている値(つまりプルダウンの候補になる値)が入るという設定をします。

# models.py

class IgMstProduct(models.Model):
    id = models.AutoField(primary_key=True)
    product_nm = models.CharField(max_length=60, blank=True, null=True)
    brand_cd = models.ForeignKey('IgMstBrand',on_delete=models.SET_NULL, null=True, db_column='brand_cd')
    product_url = models.TextField(blank=True, null=True)

    class Meta:
        managed = False
        db_table = 'ig_mst_product'

注意点

上記の設定時、「db_column」で DB 側で実際のカラム名を指定しないと、フォーム Submit 時に「1054, “Unknown column ‘〜_id’ in ‘field list'”」というエラーが返ってくると思います。

詳しくは調べていませんが、どうやら明示的に指定しないと Django が自動的に「〜_id」というカラム名で処理をしようとするらしいです。

2. forms.py で ModelChoiceField を設定

forms.py で、下記の様に対象の項目に対して forms.ModelChoiceField(queryset=モデル名.objects.all()) を設定してみると、それっぽいプルダウンが表示されます。

# forms.py

class IgProductForm(forms.ModelForm):
    brand_cd = forms.ModelChoiceField(queryset=IgMstBrand.objects.all())

    class Meta:
        model = IgMstProduct
        fields = ('product_nm', 'product_category', 'brand_cd', 'product_url',)

が、このままだとプルダウンの表示名が下記の様に「モデル名 object (1)」とかになるので変更します。

<!-- Chrome で「検証」した例 -->

<select name="brand_cd" required id="id_brand_cd">
  <option value="" selected>---------</option>
  <option value="1">モデル名 object (1)</option>
  <option value="2">モデル名 object (2)</option>
  <option value="3">モデル名 object (3)</option>
  <option value="4">モデル名 object (4)</option>
  <option value="5">モデル名 object (5)</option>
  <option value="6">モデル名 object (6)</option>
</select>

3. 任意のカラムの値を表出する様変更

同じく forms.py で ModelChoiceField を継承する別クラスを作成し、そこで label_from_instance 関数をオーバーライドし、return obj.表示したいカラム名 とすれば表示したいカラム名が表示名が変わります。

# forms.py

class CustomModelChoiceField(forms.ModelChoiceField):
    def label_from_instance(self, obj): # label_from_instance 関数をオーバーライド
         return obj.brand_nm # 表示したいカラム名を return


class IgProductForm(forms.ModelForm):
    brand_cd = CustomModelChoiceField(queryset=IgMstBrand.objects.all()) # 上記のクラスを参照する様変更

    class Meta:
        model = IgMstProduct
        fields = ('product_nm', 'product_category', 'brand_cd', 'product_url',)
<select name="brand_cd" required id="id_brand_cd">
  <option value="" selected>---------</option>
  <option value="1">Nikon</option>
  <option value="2">Canon</option>
  <option value="3">Sony</option>
  <option value="4">Fujifilm</option>
  <option value="5">Leica</option>
  <option value="6">Olympus</option>
</select>