vpsadmin@xx1-234-56789:~$ sudo mysql
Welcome to the MySQL monitor.  Commands end with ; or \g.
Your MySQL connection id is 11
Server version: 8.0.23-0ubuntu0.20.04.1 (Ubuntu)

Copyright (c) 2000, 2021, Oracle and/or its affiliates.

Oracle is a registered trademark of Oracle Corporation and/or its
affiliates. Other names may be trademarks of their respective
owners.

Type 'help;' or '\h' for help. Type '\c' to clear the current input statement.

mysql>
(testvenv) vpsadmin@ss1-234-56789:~$ python3.9
Python 3.9.0+ (default, Oct 20 2020, 08:43:38)
[GCC 9.3.0] on linux
Type "help", "copyright", "credits" or "license" for more information.
>>> import MySQLdb
>>>
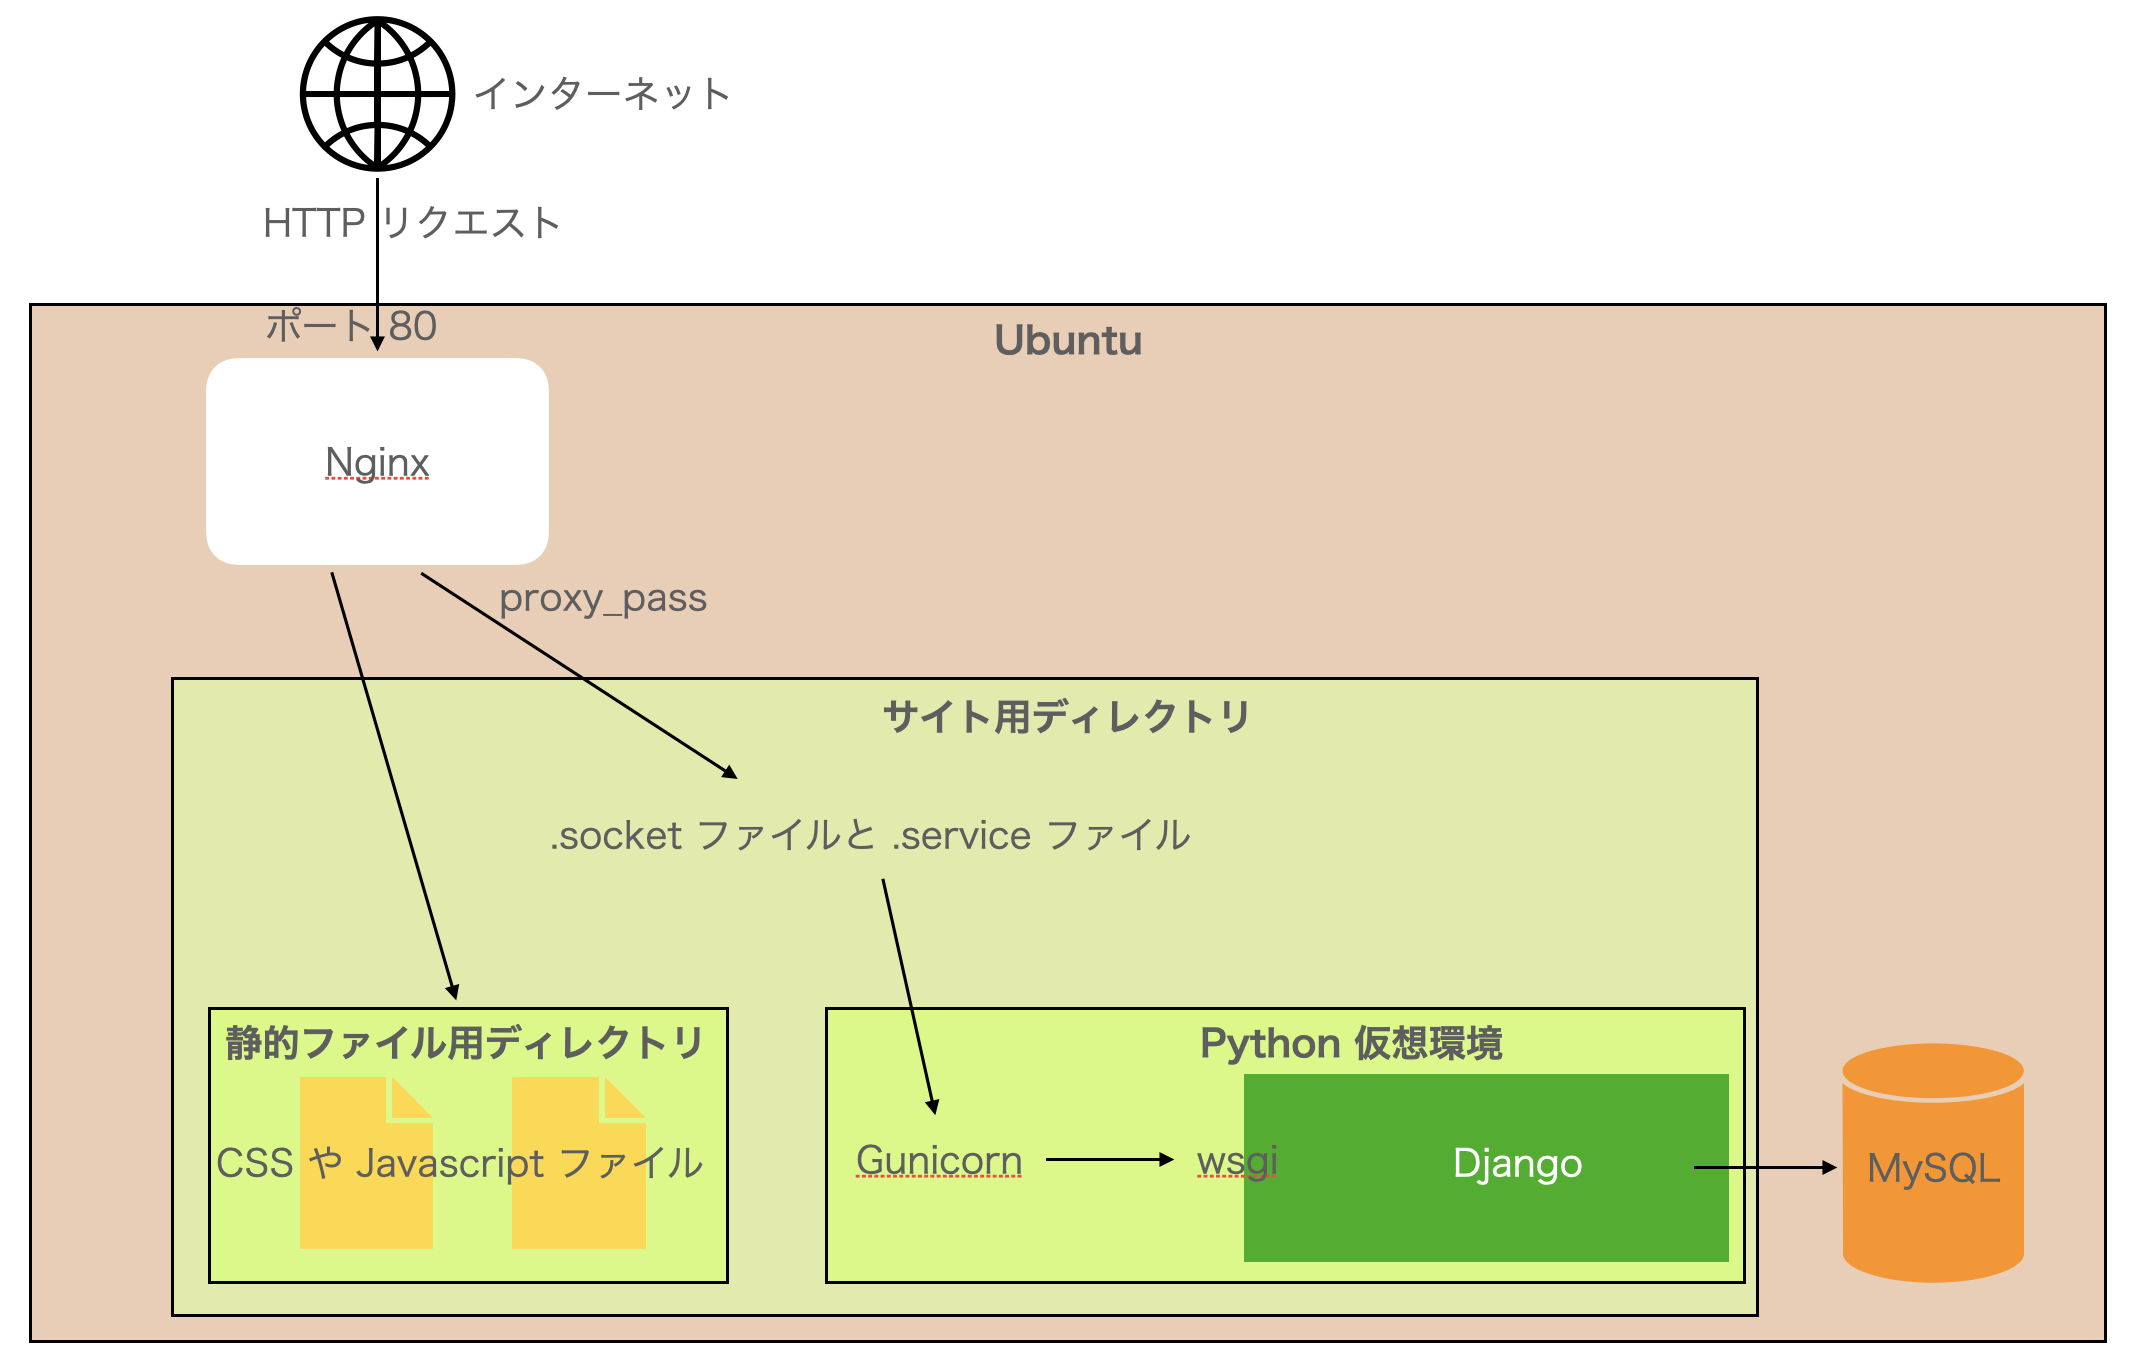
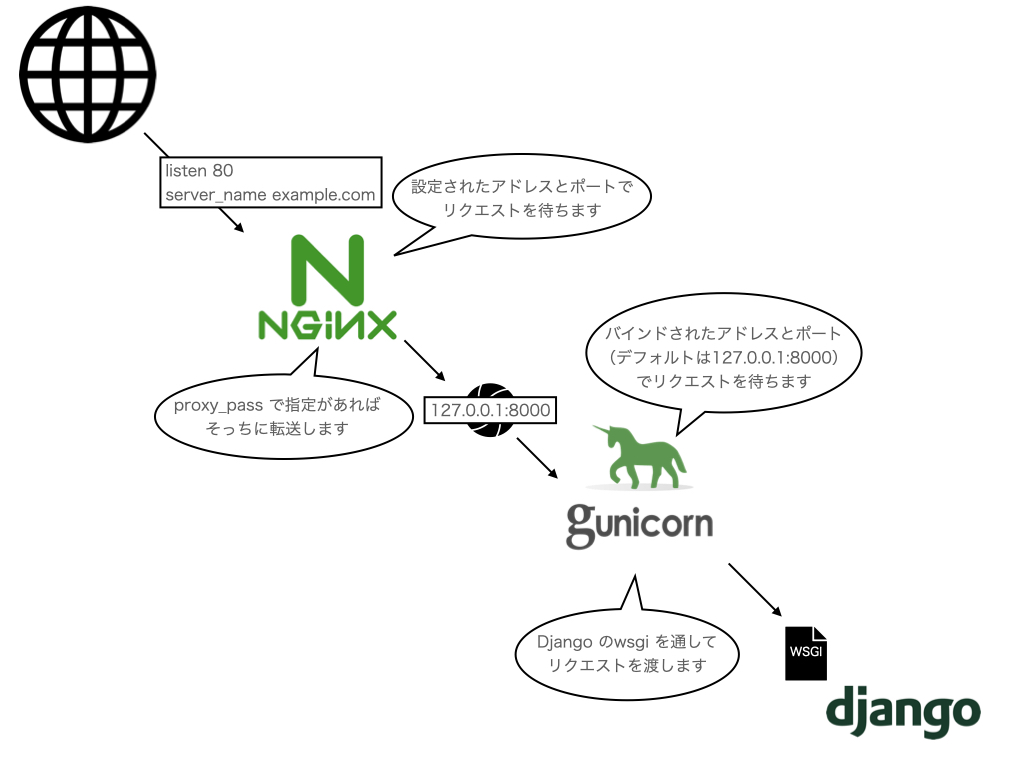
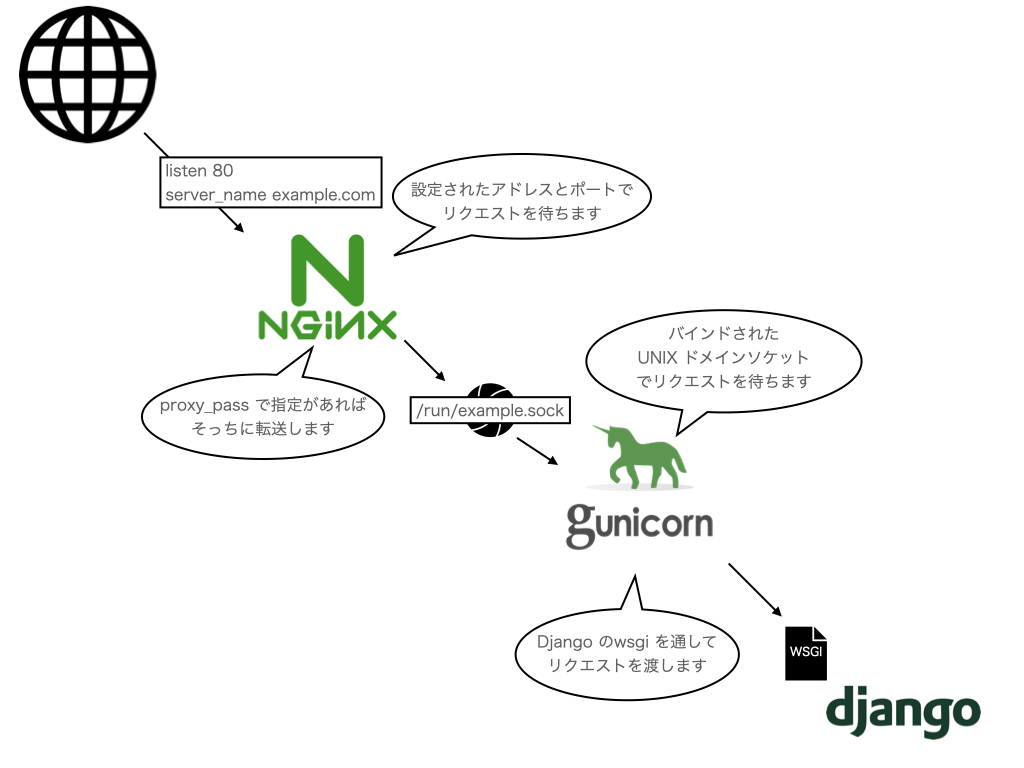
Nginx はデフォルトで「/var/www/html」というディレクトリを作っていますが、今回は /var/www/ の配下にドメイン名のディレクトリ、そしてその配下に html というディレクトリを作ります。(イメージ:/var/www/example.com/html)
vpsadmin@xx1-234-56789:/var/www$ sudo mkdir -p example.com
[sudo] password for vpsadmin:
vpsadmin@xx1-234-56789:/var/www$ ls
html  meatthezoo.org
vpsadmin@xx1-234-56789:/var/www$ cd example.com
vpsadmin@xx1-234-56789:/var/www/example.com$ sudo mkdir -p html
コピーした方のファイルを確認します。下の方に Virtual Host のための設定というところがあるのでそちらを使います。上半分は Default Server のための設定なので全てコメントアウトします。
server_name と location / の部分を編集しました。
example.com ファイルの Virtual Host 設定部分
# Virtual Host configuration for example.com
#
# You can move that to a different file under sites-available/ and symlink that
# to sites-enabled/ to enable it.
#

server {
        listen 80;
        listen [::]:80;

        server_name www.example.com;
        return 301 http://example.com$request_uri;
}


server {
        listen 80;
        listen [::]:80;

        server_name example.com;

        root /var/www/example.com/html;
        index index.html;

        location / {
                try_files $uri $uri/ =404;
                include proxy_params;
                proxy_pass http://127.0.0.1:8000;
        }
}
$ sudo nginx -t
nginx: the configuration file /etc/nginx/nginx.conf syntax is ok
nginx: configuration file /etc/nginx/nginx.conf test is successful
$ sudo systemctl restart nginx
初めて接続する際に下記の様に「The authenticity of host ‘xx1-234-56789.vs.sakura.ne.jp (123.456.78.90)’ can’t be established.」とメッセージが出ることがありますが特に問題ないので yes と打ち込みます。
The authenticity of host 'xx1-234-56789.vs.sakura.ne.jp (123.456.78.90)' can't be established.
ECDSA key fingerprint is XXX123:ABCDEFGHIJKLMNOPQRSTUVWXYZ.
Are you sure you want to continue connecting (yes/no/[fingerprint])?
Are you sure you want to continue connecting (yes/no/[fingerprint])? yes
Warning: Permanently added 'xx1-234-56789.vs.sakura.ne.jp.123.456.78.90' (ECDSA) to the list of known hosts.
% ssh ubuntu@xx1-234-56789.vs.sakura.ne.jp
ubuntu@xx1-234-56789.vs.sakura.ne.jp's password:
パスワードを入力し無事 ssh で サーバーへログインできました。
% ssh ubuntu@xx1-234-56789.vs.sakura.ne.jp
ubuntu@xx1-234-56789.vs.sakura.ne.jp's password:
Welcome to Ubuntu 20.04.1 LTS (GNU/Linux 5.4.0-52-generic x86_64)

 * Documentation:  https://help.ubuntu.com
 * Management:     https://landscape.canonical.com
 * Support:        https://ubuntu.com/advantage

  System information as of Fri Apr  9 08:11:04 JST 2021

  System load:  0.0               Processes:             105
  Usage of /:   2.0% of 94.43GB   Users logged in:       0
  Memory usage: 16%               IPv4 address for ens3: 123.456.78.90
  Swap usage:   0%


66 updates can be installed immediately.
0 of these updates are security updates.
To see these additional updates run: apt list --upgradable


The list of available updates is more than a week old.
To check for new updates run: sudo apt update


The programs included with the Ubuntu system are free software;
the exact distribution terms for each program are described in the
individual files in /usr/share/doc/*/copyright.

Ubuntu comes with ABSOLUTELY NO WARRANTY, to the extent permitted by
applicable law.


SAKURA internet [Virtual Private Server SERVICE]

To run a command as administrator (user "root"), use "sudo <command>".
See "man sudo_root" for details.

ubuntu@xx1-234-56789:~$
3行目に「Welcome to Ubuntu 20.04.1 LTS」と書かれてあります。それ以降の部分はサーバーの容量やアップデートなどの案内事項です。
ubuntu@xx1-234-56789:~$ sudo reboot
Connection to xx1-234-56789.vs.sakura.ne.jp closed by remote host.
Connection to xx1-234-56789.vs.sakura.ne.jp closed.
%
一度上記の管理者の変更を飛ばした際、後で Django の「python manage.py startapp アプリ名」を実行した時に「ImportError: Couldn’t import Django. Are you sure it’s installed and available on your PYTHONPATH environment variable? Did you forget to activate a virtual environment?」というエラーが出ました。
$ sudo apt update
$ sudo apt install git
Reading package lists... Done
Building dependency tree
Reading state information... Done
git is already the newest version (1:2.25.1-1ubuntu3.1).
git set to manually installed.
0 upgraded, 0 newly installed, 0 to remove and 18 not upgraded.